 Français
 English
 Español
 Deutsch
 Português


Roofing and coverings
Calculation of roof area on a PDF plan: method, formulas and examples roofers
The roof area calculation is done panel by panel: measure the horizontal projection of each side, including the edges, then divide it by the cosine of its slope angle. If the slope is expressed as a percentage, multiply the projection by the corresponding coefficient. Then add up the panels. A roof with a footprint of 100 m² viewed from above thus develops 115.47 m² of coverage with a slope angle of 30°.
Test for free: a complete file offered.
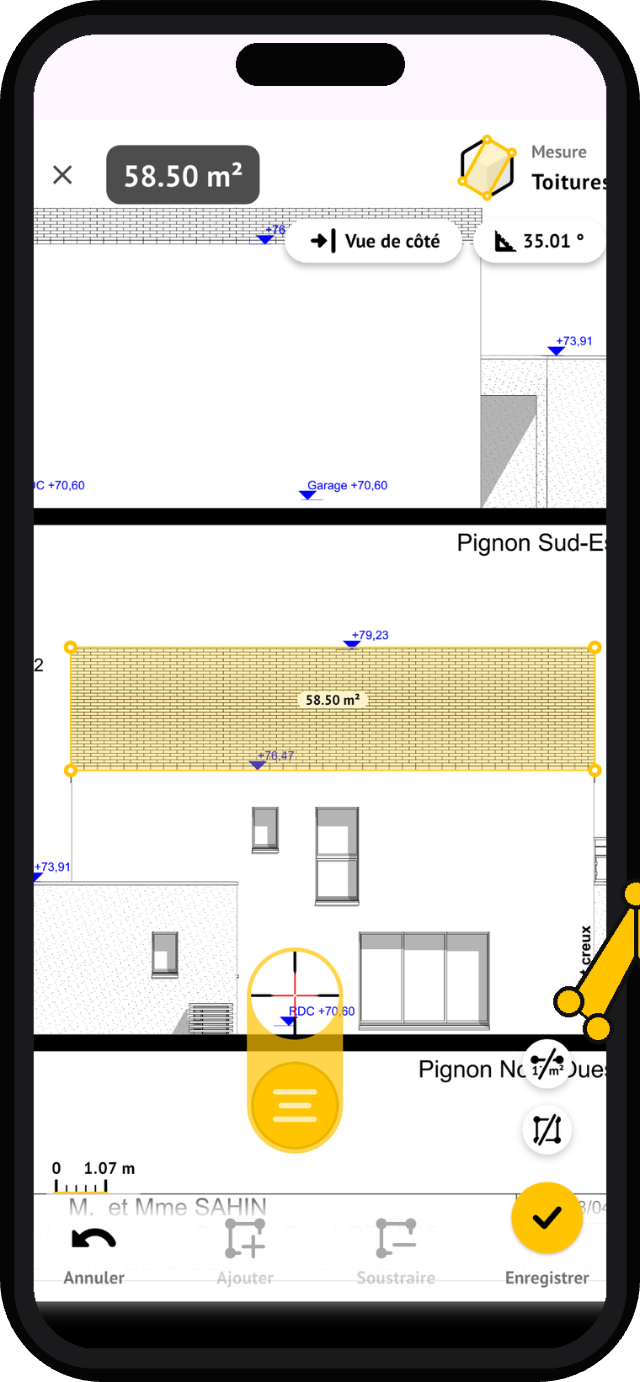
The slope is taken into account: actual surface area of coverage, not the plan projection.
Your 3 measurements Keys
Sloped roofs
Actual coverage surface calculated with the angle, directly on the plan.
Linear
Eaves, ridge caps, gutters: the total accumulates as it goes along.
Surfaces with deductions
Deduct dormers and chimney stacks in two moves.
From quotation to roof
Prepare a roofing quote
From the plan received by email: surface of each slope with its pitch, lengths of eaves and ridges. Your quote is based on reliable quantities.
Check quantities before ordering
Tiles, battens, gutters: recheck the surfaces and lengths before placing your order, without asking the office for measurements again.
On-site inspection
On the roof, the plan is already in your pocket. Doubt about a measurement? You measure on-site, even without a signal.
This page brings together the method used by roofers to calculate a roof based on a PDF plan: the formulas with a percentage slope Or in degrees, two-and-four-bay roofs, eaves, complex roofs, recalculated examples and errors that distort a quote. You will also see how to measure each panel, its eaves and its eaves lining directly on the plan with MeasureAll, in the office and on site.
A reminder before we begin: the coverage area, the quantity of materials to order, and the area covered in the quote are three different numbers. This page gives you the first one, explains how to switch to the other two, and points out what a calculation cannot validate for you.
Calculation of roof area: the formula in 30 seconds
A roof is measured in two ways. From the sky, it occupies a horizontal area: this is the projected area, that which is measured on a roof plan or a plan of the mass from above. On the roof, the covering follows the inclination of the slopes: this is the developed area, which is always larger than the projection as soon as the roof is sloped. This is what is used to calculate the coverage.
For a flat panel whose inclination is constant, the transition from one to the other is governed by a formula:
Developed area = projected area ÷ cos(slope angle)
If your slope is expressed as a percentage, an equivalent formula avoids having to use the angle:
Developed area = projected area × √(1 + (slope in % ÷ 100)²)
The term that multiplies the projected area is called the slope coefficient. It is 1.0440 for a slope of 30%, 1.1547 for an angle of 30° and 1.4142 for a slope of 100%, i.e., 45°. Each side receives the coefficient based on its own slope. If all the sides have the same inclination, a single coefficient applies to the total area of the roof, regardless of its shape.
The four surfaces that should not be confused
A large part of the calculation errors comes from a mix of surfaces that don’t measure the same thing. Before calculating anything, identify the one you have:
- The grip of the walls : the contour formed by the external walls, excluding the roof overhangs.
- The projected surface of the roof : the contour of the cover viewed vertically, including the edges. This is the basis of the calculation.
- The habitable surface : an interior surface, which only includes the parts of a ceiling height sufficient. It does not say anything about the overhangs, the thickness of the walls or the slopes, and is not used to calculate a roof.
- The developed area : the actual surface of the inclined slopes, obtained from the projection and the slope. This is the one that is covered.
A significant discrepancy between the floor area of a house and the covered area listed on a quotation is therefore not necessarily an error. This is verified, but only by recalculating the calculation from the actual area of the roof, its overhangs and slopes, never by comparing the quotation to the living area.
Calculation of the roof area: the data to be collected
To perform the calculation without approximation, combine:
- a roof plan or a plan of the mass of the building, or, failing that, reliable external dimensions;
- the roof overhangs at the eaves and on the ridge, noting whether they are measured horizontally or along the eaves;
- the slope of each side, in percentage or degrees, with its unit;
- a cut or a gable facade if the slope is not indicated; to find it from the height and span;
- the list of openings and penetrations: roof windows, chimney shafts, skylights, ventilation outlets.
With these elements, the calculation is done on a sheet of paper. Without them, no tool can create a dimension that is absent from the plan: a poorly dimensioned PDF remains a poorly dimensioned PDF, even when measured with the best software.
Read a roof plan before measuring
A plan file contains several views, and each provides different information. Confusing them is the first source of error, even before the first calculation.
Mass plan, roof plan, section, facade
- The mass plan Locates the building on its plot. According to the draftsman, the contour represented is that of the walls or that of the roof; it sometimes bears the lines of the eaves, rarely the slopes.
- The roof plan represents the top view coverage: contour with the edges, breaks, ridges, grooves, openings and, when the architect has planned it, the direction and value of the slopes. This is the ideal document for measuring the foundations.
- The cup It cuts the building vertically. It gives the heights to the gutter and the facade, the span, and therefore the slope when it is not specified.
- The gable facade shows the profile of the roof as seen from the front. It also makes it possible to find the slope, provided that it is drawn in true size and not in perspective.
For a complete calculation, it is almost always necessary to combine a top view for the surfaces and a section or facade for the slopes.
Scale, ratings and plan index
Before measuring, check three points. The index and the date of the plan first: a building permit plan is not necessarily the execution plan, and a change in the structure can change a slope. The scale then: on a PDF, the scale indicated in the cartridge is reliable only if the document has not been reduced or enlarged during printing or export. The coordinates finally: when a coordinate is inscribed, it takes precedence over the graphical measurement.
The right approach is to calibrate the plan on a known reference point, the longest possible, then to check a second independent reference point. If the second point does not fall exactly, first check your points and the reference point itself. If the discrepancy persists, the plan may have areas at different scales or a deformation: do not measure anything else until you understand why.
How the edges appear on the plan
On a roof plan, the outer contour drawn normally includes the overhangs: the surface measured within this contour is then directly the projection of the roof. On a level plan, the contour drawn is that of the walls: the overhangs must be added. On a mass plan, check what the contour represents, because according to the designer it is either the walls or the roof. Read the measurements carefully, because an overhang on the side of the slope does not have the same length as its horizontal projection. In case of doubt, start from the contour of the walls, add the converted horizontal overhangs and note this assumption in your measurement.
To convert a side-slope overflow along the ramp into a horizontal overflow, divide it by the slope coefficient of the slope. A 0.50 m overflow measured in the direction of the slope on a 40% slope corresponds to 0.50 ÷ 1.0770 = 0.464 m horizontally. This second value is added to the dimensions of the walls before applying the coefficient. Adding the 0.50 m directly would mean counting the slope twice on this strip.
Calculating the roof surface with a slope: the step-by-step method
Calculating the roof area with a slope always follows the same order. Formalizing it saves time, because skipping a step can skew the entire estimate.
- Identify the right plan. Check the index and the date, then separate the views: top view for the embankments, section or façade view for the heights and slopes.
- Check the scale. Calibrate on a known value and control a second independent value.
- Measuring the projection of each side, Horizontal edges included, with the same convention for all sizes.
- Associate the slope of each side with its angle, By distinguishing percentages and degrees.
- Convert each projection into a developed surface with the slope coefficient, then add it up.
- Treat separately The openings, accessories and shelving: siding, trim, gutters, brackets and ties do not extend over an entire surface.
The transition to the quantity of materials comes only later, once the cover model and its overlays have been chosen.
Slope in percentage or degrees: 30% is not 30°
This is a classic confusion, and it costs dearly: on the same roof, it can distort the surface by more than 10%. A percentage slope expresses the ratio between the elevation and the horizontal distance: 30% means 30 cm of height for 1 m horizontally. A angle in degrees measures the inclination of the slope relative to the horizontal. The two are not proportional: 30% corresponds to 16.70°, and 30° corresponds to 57.74%.
On a 80 m² area, confusion changes the result by 8.85 m²: 83.52 m² with a slope of 30%, compared to 92.38 m² with an angle of 30°. Before taking on a slope, always check its unit on the plan or in the manufacturer's instructions.
The following tables provide the most useful correspondences, recalculated. The coefficient is the one that multiplies the projected area to obtain the developed area.
| Slope in % | Angle in degrees | Surface coefficient |
|---|---|---|
| 10 % | 5,71° | 1,0050 |
| 20 % | 11,31° | 1,0198 |
| 25 % | 14,04° | 1,0308 |
| 30 % | 16,70° | 1,0440 |
| 35 % | 19,29° | 1,0595 |
| 40 % | 21,80° | 1,0770 |
| 45 % | 24,23° | 1,0966 |
| 50 % | 26,57° | 1,1180 |
| 60 % | 30,96° | 1,1662 |
| 70 % | 34,99° | 1,2207 |
| 75 % | 36,87° | 1,2500 |
| 80 % | 38,66° | 1,2806 |
| 100 % | 45,00° | 1,4142 |
| Angle in degrees | Slope in % | Surface coefficient |
|---|---|---|
| 15° | 26,79 % | 1,0353 |
| 20° | 36,40 % | 1,0642 |
| 25° | 46,63 % | 1,1034 |
| 30° | 57,74 % | 1,1547 |
| 35° | 70,02 % | 1,2208 |
| 40° | 83,91 % | 1,3054 |
| 45° | 100,00 % | 1,4142 |
| 50° | 119,18 % | 1,5557 |
Two notes to read these tables. A slope of 100% corresponds to 45°, not a vertical wall: at 90°, the horizontal distance is zero and the percentage is no longer defined. And if your calculator gives inconsistent results, check that it is working in degrees and not in radians.
The Rampant, or how Pythagoras helps the plasterer
The slope refers to the inclined length of a slope, from the gutter to the eaves. It is calculated from two lengths found on a section: the horizontal distance D between the gutter and the eaves, which, on a symmetrical roof, corresponds to the half width of the roof, including the gutter overhang, and the elevation H between these two points.
Rampant = √(D² + H²)
Example: With D = 4 m and H = 3 m, the slope measures √(16 + 9) = 5 m, and the slope is 3 ÷ 4 = 75%. Beware of the inverse trap: dividing the elevation by the length of the slope, here 3 ÷ 5, gives 60%, an incorrect result, because a slope always relates to the horizontal distance.
Once the radius is known, the surface area of a rectangular panel can be calculated directly: length to the sewer × overhang. The result is identical to that obtained with the slope coefficient, which provides useful control.
The calculation works in the other direction too. If the slope gives the slope R and the elevation H, the horizontal distance is equal to D = √(R² − H²). With a ramp of 5.20 m and a gradient of 2 m, we obtain D = √(27.04 − 4) = 4.80 m, and a slope of 2 ÷ 4.80 = 41.67%.
Calculating the roof surface with an unknown slope: finding it on the plan
A top view does not contain the slope information: two roofs with the same pitch may have very different inclinations. If the slope is not marked, look for a cut, a gable facade, or a rafter plan. Measure the difference in elevation between the gutter and the eaves and the corresponding horizontal distance, then calculate: slope (%) = 100 × H ÷ D.
Check that the view correctly represents the slope in the direction of its greatest slope: an oblique profile or a perspective view does not give the actual inclination. And beware of photos: perspective distorts the angles, and two lines drawn on an image do not give a reliable slope.
Calculation of the m2 of the roof: how many m2 for your roof?
Let's take a case that roofers encounter every day: a rectangular house, a roof with identical two-sided slopes, with overhangs on all four sides. The data are fictitious but realistic, and each result has been recalculated without intermediate rounding.
Data : walls 10 × 8 m, horizontal edges 0.40 m on all four sides, slope of 40% on both sides.
- Roof overhang included: (10 + 0.80) × (8 + 0.80) = 10.80 × 8.80 = 95.04 m².
- Slope coefficient at 40%: √(1 + 0.40²) = 1.0770.
- Developed area: 95.04 × 1.0770 = 102.36 m².
- Control by the ramp: the horizontal half width is 4.40 m, the ramp is 4.40 × 1.0770 = 4.739 m, and the surface is 2 × 10.80 × 4.739 = 102.36 m².
Result: 102.36 m² of roof covering. Without the protrusions, the same calculation would have given 86.16 m², which is 16.20 m² less, almost 16% of the actual surface area.
Note that the result is not multiplied by two: the area of 95.04 m² already covers both slopes. Multiplying it by the number of slopes is a classic mistake, which doubles the surface area.
How many square meters of roof for a 100 m² house?
The question comes up often, and the honest answer is that one cannot know this with the surface area of the house alone. One must take into account the actual coverage, the overhangs, and the slope of each side. As an example, 100 m² of projection gives 104.40 m² of coverage with a slope of 30%, 111.80 m² with a slope of 50%, and 115.47 m² with an angle of 30°. And with 40 cm of overhang around a 10×10 m house, the roof coverage already exceeds 116.64 m² even before applying the slope.
In other words, a serious m2 calculation for the roof never starts from the habitable surface: it starts from the roof itself.
The complete measurement does not stop at the m²
To calculate and order, surface area is not enough: the lengths also need to be taken into account. For the roof in the example, the complete measurement includes:
| Element | Calculation | Result |
|---|---|---|
| Cover | 95,04 × 1,0770 | 102.36 m² |
| Felling | length of the roof | 10.80 m |
| Sewers | 2 × 10,80 | 21.60 m |
| Rives | 4 banks × 4,739 | 18.96 m |
These lengths are used to order guttering, eaves tiles, guttering and gutter bands. They are measured separately, on the top view for the guttering and the gutters, and from the eaves for the eaves.
Calculation of the 2-layer roof m2: symmetrical or asymmetrical
The two-slatted roof is the most common. For a calculation of 2-slatted roof area per m2 with identical slopes, two formulas give the same result:
- by the grip Surface = total roof area, including the edges, × slope coefficient;
- by the rampant Surface = 2 × length of roof × width of one panel.
The length of the roof includes the ridge ends, and the slope includes the gutter edge. Use one of the formulas to calculate and the other to check: if the two results differ, one of the slopes is incorrect.
Two different slopes
When the two sides do not have the same slope, the calculation m2 of roof covering for each side is made for each side: area = length × (slope 1 + slope 2). Never average the two slopes: the coefficient does not vary proportionally to the slope, and averaging distorts the result.
Example : roof 10 m long, even gradient of 3 m for both sides, but horizontal projections of 4 m and 6 m. The slopes therefore amount to 75% and 50%.
- Panel 1: Rampant = √(4² + 3²) = 5 m, surface = 10 × 5 = 50.00 m².
- Panel 2: Rampant = √(6² + 3²) = 6.708 m, surface = 10 × 6.708 = 67.08 m².
- Total: 117.08 m².
Control by the plots: 40 m² × 1.25 + 60 m² × 1.1180 = 117.08 m². If the average slope of 62.5% had been applied to the entire 100 m² plot, the result would have been 117.92 m². The difference remains small in this example, but it grows with the difference between the two slopes, and there is no reason for it to exist.
Calculation of the 2-layer roof m2: the dimensions to check on the plan
On a roof with two symmetrical sides, three data are sufficient: the length of the roof, including ridge ends, the total width, including gutter ends, and the slope. If the slopes are asymmetrical and their gutters are at the same level, you must also take into account the position of the eaves, that is, the horizontal projection of each side, or the slope of each side. An eaves that is offset from the top view indicates two different slopes or gutters at different heights: check this on the cross-section before calculating.
Roof 4 panels, eaves and pavilion: the same logic
A four-sided roof seems more complicated. It is not, provided that all the sides have the same slope. In this case, the total area developed remains the roof area multiplied by the slope coefficient, exactly as for two sides.
Example Roof contour of 12 × 8 m, including the edges, four sides at 75%, drainage at the same level. For a width of 4 m, the gradient is 4 × 0.75 = 3 m, the inclined height of each side √(4² + 3²) = 5 m, and the parapet measures 12 − 8 = 4 m.
- Two trapezoids, the long sides: (12 + 4) ÷ 2 × 5 = 40 m² each.
- Two triangles, the cubicles: 8 × 5 ÷ 2 = 20 m² each.
- Total: 2 × 40 + 2 × 20 = 120 m².
Control by the area: 12 × 8 = 96 m², multiplied by the coefficient of a slope of 75%, or 1.25, gives 120 m². A two-slope roof covering the same area with the same slope would have exactly the same surface area. A pavilion roof, on a square plan, consists of four triangles: the same rule applies.
By the way, a simple rule for checking the plan: when the four sides have the same slope and the gutters are at the same level, the eaves measure the length of the roof minus its width. Here, 12 − 8 = 4 m. An eaves drawn longer or shorter indicates corbels at a different slope from the long sides.
Some online calculators automatically add 10 to 15% for a four-sided roof. This example shows that the geometry does not justify it: with equal area and slope, the eaves do not create additional surface area. On the other hand, they increase the cuts, therefore the material losses, which are taken into account at the time of ordering and not in the calculation.
Angle and height of the triangle: do not confuse them
To calculate a triangle or trapezoid in the plane of the pan, its height measured in that plane must be perpendicular to the drain. The eaves, on the other hand, is an oblique side that is longer than this height. Using it as the height will increase the surface area. In the example above, the inclined height of the panels is 5 m, whereas each eaves measures √(4² + 4² + 3²) = approximately 6.40 m.
Different pitches on the pitches
If the corbels have a different slope from that of the long sections, calculate each section with its own dimensions and coefficient, then add them together. The unique coefficient only applies to identical slopes. On the top view, a steeper corbel is identified by a triangle that is shallower than half the width of the roof, and therefore longer eaves.
Complex roofs: eaves, eaves, dormers and openings
No real roof is a case in point. However, the rule remains the same: cut the roof into flat areas with uniform slope, calculate each one, and then add them up.
- Appentis, or roof with one panel It is an inclined rectangle, not a triangle. Surface = length × slant, or area × coefficient.
- Noses and extensions Each panel is calculated separately. The seam is a line of contact between two panels, not a surface, and is measured in linear units.
- Lucarnes and the sitting dogs Their small sections are measured separately, with their own slope.
- Brisis and Terrasson, On a Mansart roof: two very different slopes on the same slope, therefore two calculations.
- Superimposed levels If two covers overlap in the upper view, such as a canopy under a ledge, do not merge the supports of the two covers.
- Curved or domed roofs A unique angle is not enough. The shape must be cut into facets or used with its exact geometry.
Example: L-shaped house with a curve, same slope everywhere
A geometric property simplifies many complex roofs: when all the sections have the same slope, the total developed area is equal to the total area multiplied by the coefficient, even with ties, eaves and sections of different shapes.
For a L-shaped house with a roof contour, including eaves, measuring 150 m² on the roof plan, with a slope of 35% on all sides, the roof area is 150 × 1.05948 = 158.92 m². No need to calculate every triangle and every trapezoid: it is sufficient to measure the contour precisely. The ribs and ridges are then counted in linear units for the accessories. When inclined, they appear shortened in the top view: calculate their true length from their projection and the elevation, as for the ridge in the four-slat example.
This property no longer holds true once a slope differs: a skylight, a canopy, or an extension with a lower slope must be calculated separately from the overall calculation.
Roof windows and trunks: deduct, but not in any way
A roof window or a chimney flue reduces the actually covered area. Therefore, the amount of material is subtracted from the area measured in the plan of the roof. If you measure it from above, multiply it by the panel coefficient. For the quote, it is different: the rule for deducting small openings depends on the market and what has been agreed with the client. No single national rule imposing the deduction of openings from a surface threshold has been identified: the convention is that of the market.
So keep two columns in your calculation: the net geometric area, which is used to order, and the area retained in the quote, which follows the market convention. Except for the supports and fittings around each penetration, which are counted in units or linear meters.
Calculation of roof area without plan: aerial view, survey and limits
Not all renovation projects have a workable plan. In renovation projects, the original plan is often unavailable, or no longer corresponds to the building after the work has been completed. There are two solutions, with very different levels of reliability, and a false idea of what is best to do.
Aerial view, for a first estimate
Mapping tools allow one to trace the outline of a roof on an aerial image and obtain its surface area. Public service cartes.gouv.fr, which succeeds the Géoportail of the IGN, offers free tools for measuring distances and areas. Google Earth also allows you to draw polygons and display their area.
These surfaces are projections: they do not take into account the slope. Google clarifies that its measurements do not take altitude changes into account. Therefore, a roof area calculation must then be made using this footprint, which requires knowing the slope elsewhere. The accuracy depends on the quality of the image, its alignment, and the clarity of the contour of the edges: this is an estimate for a first calculation, not a measurement.
The on-site survey, for a fixed quote
For a firm quote without a plan, a survey remains necessary: lengths of façades and gables, heights at the eaves and the eaves frame, overhangs. These measurements allow for drawing a side sketch or a simple plan, on which the calculation of the roof area is then done as on an architect’s plan. The heights are measured from the ground, using a laser rangefinder, for example, which allows estimating the slope on the gable without accessing the roof covering, by overlapping several measurements to check the accuracy.
And the photo?
A facade photo does not provide reliable slope measurements, even with a reference point placed in the image: perspective distorts angles and lengths. It is used to document the condition of the roof and its unique features, not to measure them.
Errors that distort a calculation of m2 of roofing
These errors appear in the disputed estimates as well as in poorly dimensioned orders. They are all corrected at the stage of the measurement.
- Starting from the habitable surface. It does not describe the edges, the external grip, or the slopes.
- Forget the edges, or count them twice. If the plan already represents the outer contour of the roof, the overhangs are included.
- It is easy to confuse a horizontal overflow with a measured overflow along the ramp. The second one must be projected before it is added to a horizontal dimension.
- Confusing 30% and 30°. On 80 m² of floor space, the difference reaches 8.85 m².
- Multiply by the number of panels an overhang that already covers the entire roof.
- Average the slopes instead of calculating each side separately.
- Taking the gauge for height of a triangle or a trapezoid.
- Poorly calibrating the plan. A 2% error on each length produces a 4.04% error on the surface, because it is reflected in both dimensions.
One final confusion deserves to be noted: the roof area is not the quantity to order. Between the two, there are the cover model, the coverings, the cuts and the packaging.
MeasureAll, a roofing software for measuring on a PDF plan
All the previous steps can be done by hand, with a printed plan, a scale, and a calculator. They go faster, and without having to copy the measurements from one support to another, when the plan is measured directly on the screen. This is the role of a roofing software Like MeasureAll: an iOS and Android app that measures lengths, areas and slopes on a PDF plan, both in the office and on the construction site.
Import and calibrate the plan
Import the PDF plan received by email into the application. To calibrate it, place two points on a known dimension and enter its actual length: the adjustment is made once per page. Then check a second independent dimension. If the same page contains details at different scales, check a dimension in each area before measuring: the calibration only applies to the scale on which it was made.
Measure each panel with its slope
Draw the contour of a slope and enter its slope in the unit requested by the application: MeasureAll calculates the coverage area taking into account this slope, and not the only visible projection on the plan. The roof windows and chimney outlets are deduced from the relevant area. Each measurement is named and listed by site, which makes it possible to find the details of the area piece by piece when drafting the estimate or responding to a customer question.
Repairing damage, embankments and gutters
The linear tool accumulates the lengths as you place your points. In the top view, the vertical supports, drains and gutters are measured in real length. The banks, slopes and curves appear shortened: measure the banks on a cut or gable facade, or multiply their projection by the panel coefficient, and calculate the slopes and curves separately. These lengths are used to order accessories, which are not deducted from a surface area. The measurements are exported in a format readable by a spreadsheet and shared via email, messaging or to a computer.
In the office, on the construction site, even without a network
Once the plans are loaded into the application, the measurement function works offline: on an isolated construction site or in an area without mobile coverage, you maintain access to your plans and measurements. On the same device, the file is used to prepare the quotation at the office, to verify quantities before placing an order, and then to check a quote on site.
Example: of a plan received in accordance with the specifications of the quotation
Let’s take the house from the previous example, with its 40% two-slatted roof, and follow the progress of a file.
- The client sends the roof plan and a PDF cut via email. You import them into the application.
- You calibrate the roof plan based on the length of the facade, which is 10 m, and then you check the width, which is 8 m.
- You draw the contour of each side, including the edges, and you record the slope measured on the profile: 40%, or 21.80° if the application requests it in degrees. The application calculates the coverage area. Cut it out using the manual calculation presented above, which gives 102.36 m² for these measurements: a slight discrepancy is due to the precision of the contour, while a significant discrepancy indicates a problem with the calibration, contouring, or slope.
- You measure the eaves and gutters on the roof plane, then the edges on the cut or from the eaves, totaling 4 × 4.739 = 18.96 m, naming each measurement to find it.
- You export the measurements to a spreadsheet to prepare the quote, and you keep the file in the app for the order and the job site.
For a calculation of a 2-slope roof like this one, the main work consists of two checks that are done before drawing the plan: the calibration of the plan and the unit of the slope. The rest is geometry, which the application does for you.
What a roofing software doesn’t do for you
MeasureAll measures what the plan contains. The application does not replace the survey when the plan is incorrect or incomplete, nor does it choose the coverage model or verify the minimum permissible slope. The switch to the number of tiles or accessories is based on the manufacturer’s data sheet: the surface area and linear dimensions measured are the input data. Finally, the accuracy of the result depends on the plan, its scale and the care taken in the calibration and drawing.
Test the calculation of your surfaces on a PDF file provided. MeasureAll is available on the’App Store for iPhone and iPad, and on Google Play For Android smartphones and tablets. A complete package is offered to try it out, then the subscription is purchased in the app.
From measurement to ordering: tiles, accessories and losses
Once the surface is known, three quantities must be distinguished and kept separate in your file:
- the geometric quantity : the actual area covered and the measured lengths;
- the contractual quantity the one shown in the quotation, according to the contract of measurement agreed with the client;
- the quantity supplied : what to buy after calculating costs, cutting, losses and rounding off for packaging.
For standard tiles, the theoretical quantity is obtained by multiplying the developed surface by the consumption per m² indicated by the manufacturer for the selected tile. This figure varies greatly from model to model: the data sheet for a tile with a large mold can indicate 12 tiles per m², while that of a traditional flat tile can be several dozen depending on the mold. There is no valid m² quantity for an entire family of tiles: only the data sheet of the model is valid.
Where does this number per square meter come from? For a tile laid in regular rows, it derives from the purée, the visible length in the direction of the slope, and the useful width, the width covered by a tile once it has been laid: tiles per m² = 1 ÷ (square footage × useful width), In meters. A 32 cm wide gutter and a useful width of 30 cm give 1 ÷ (0.32 × 0.30) = 10.42 tiles per m². The gutter is not a free adjustment to save tiles: it depends on the model, the slope and the imposed overlaps, and the consumption indicated by the manufacturer always takes precedence over this calculation.
The accessories are counted separately, starting from the shelves: ceiling panels in the meter-long version, eaves tiles in the meter-long version, eaves shelters according to the ventilation plan. For example, the 42-inch skirt with a Monier cover-up is announced at 2.8 units per meter: for the 10.80 m of the retaining wall in our example, 10.80 × 2.8 = 30.24, or 31 retaining walls after rounding up to the higher unit, to be adjusted according to the starting and end pieces.
As for the margin of loss, no universal percentage applies: it depends on the shape of the roof, the eaves, the eaves, the openings, the model and the calculation. If you assume a percentage, for example 5%, note it as such in the file, next to the measurements and not inside it. The client and the supplier will thus understand where each figure comes from.
From the measurement to the cover quote
The measurement is not the quote, but a good quote is read from the measurement. For a client or a contractor to verify it, each line must refer to an identifiable measurement. A well-constructed cover quote generally distinguishes:
- the coverage, in m², detailed by panel or by slope area;
- the linear dimensions, in meters: fences, arbours, grooves, banks and drains;
- the openings and penetrations, in unity: roof windows, trunks, ventilation outlets, with their supports;
- the possible deposition of the old cover;
- the ancillary services, quantified separately: access, collective protections, scaffolding, waste disposal.
Also indicate your assumptions: retained slope, opening deduction agreement, margin of losses, packaging. These are the factors that explain the discrepancy between the geometric surface and the quantities invoiced, and that prevent disputes at the end of the construction project.
A floor plan software provides the geometric quantities: areas and lengths. It neither sets your prices nor your floor plan conventions, which remain those of your company and the market. However, if each measurement is named by panel or zone, each quantity in the estimate can be found on the plan.
On the client side: check the surface area of a quote
If you are the project owner and the surface area in a quote surprises you, recalculate the surface area yourself: measure the roof’s footprint on the plan, including the overhangs, apply the slope coefficient, and then compare. A difference of a few percent can be due to rounding, overhangs, or a measurement agreement. A significant difference warrants questioning the company, with the plan in hand, first by verifying that you are not comparing a floor area to a roof area.
Minimum slope: what the surface calculation does not say
Calculating a surface does not say anything about the conformity of the cover. The minimum permissible slope depends on the material and exact model, the geographical area and altitude, the exposure of the site, the horizontal projection of the ramp, the presence of a screen under the roof and the conditions of implementation. There is no single minimum slope per material.
The reference to consult depends on the type of coverage. For the main cases:
| Cover | Reference document | Edition identified |
|---|---|---|
| Glued or slip-on terracotta tiles with relief pattern | NF DTU 40.21 | October 2013 |
| Glazed earthenware tiles with a flat rim | NF DTU 40.211 | April 2015 |
| Terracotta canal tiles | DTU 40.22 | May 1993, amended until 2010 |
| Flat tiles made of terracotta | DTU 40.23 | September 1996, amended in 2001 and 2007 |
| Concrete tiles with sliding and longitudinal insertion | NF DTU 40.24 | March 2023 |
| Flat concrete tiles | NF DTU 40.241 | November 2023 |
| Concrete flat tiles | DTU 40.25 | December 1984, with modifications |
| Natural shale | NF DTU 40.11 | December 2020 |
| Bricks made of cement fibers | NF DTU 40.13 | December 2009, amended in 2011 |
| Steel nerved plates | DTU 40.35 | May 1997, amended in 2006 |
| Zinc in sheets and long sheets | DTU 40.41 | September 2004 |
These documents are standards of voluntary application that become contractually binding when the works contract refers to them. In addition, for certain processes, there are Technical Notices or Technical Documents of Application, and always the manufacturer’s specifications for the exact model. CSTB publishes regularly the list of current DTUs; the version consulted for this page dates from December 9, 2025.
An example shows why values do not generalize: for its flat tile Grand Cru Écaille, Terreal indicates a theoretical slope of 70%, or approximately 35°, in zone 1, a normal situation, with a screen. This figure applies to this model and this context, not to all flat tiles or all regions. A geometric result therefore never allows one to write «compliant with the DTU»: the measurement provides a data point; compliance is verified in the applicable documents.
Measuring without going on the roof: safety begins with the measurements
Falling from height remains one of the most serious risks in buildings and public works. According to the Maladie Insurance’s 2024 morbidity booklet For this sector, 146 deaths are related to work-related accidents, including 22 from falls from height, which is approximately 15%. Falls from height also account for 16% of work-related accidents with at least four days of absence.
The’INRS reminds that collective protection takes precedence over individual equipment, and that its analysis of measures to prevent falls from a height First and foremost, the elimination of access at height when the task allows for it. The Labour Code also dedicates a specific section to this. work on the roofs, Articles R4534-85 to R4534-94: protection against falls, precautions regarding fragile materials, and conduct on roofs that become slippery due to atmospheric conditions.
Measuring the roof on a reliable plan, from the office or from the ground, avoids the climb that would only serve to take measurements. This reduces the exposure at this precise stage. It does not replace the technical inspection necessary to assess the condition of the roof, the strength of the support and the protective measures to be taken, which is prepared and equipped just like any work at height.
Equipping a company with a cover
When several people are doing the calculations and measurements in the company (business manager, team leader or construction manager), a single roofing software for the entire team allows for organized measurements to be exported in the same way, regardless of who has created them. MeasureAll offers bundled subscriptions for construction companies:
- annual subscriptions, from a few users to several hundred, with a price adjusted to the number of users;
- an activation by company code, without an individual bank card;
- a single invoice for the entire team;
- reassignable licenses when a user is deactivated;
- a response announced within 48 working hours to any request for a quote.
MeasureAll already works with construction companies, including the Cheval Group with 100 licenses. Before generalizing the tool, the simplest thing is to test it on a pilot site, using your own plans, and compare the time spent with your current method.
How is the implementation going?
- You describe your needs in the quote form: estimated number of users and, in the message, your professions and devices.
- MeasureAll promises a response within 48 working days, with a proposal adapted to the number of licenses.
- After agreeing, each employee activates the app using the company code, without entering a bank card.
- A single invoice covers all the licenses for the year.
- When a user is deactivated, their license is released and can be assigned to another collaborator.
The publisher announces a deployment in a few days and a dedicated service for business accounts.
Get your roofers ready: ask for a company quote. Specify the number of users and the relevant professions: the answer will be announced within 48 working days.
Calculating the roof area: what you need to remember
- A calculation of the roof surface with a slope is done piece by piece: horizontal projection, including the edges, divided by the cosine of the slope angle.
- A percentage slope is not a degree slope: always check the unit before calculating.
- With equal pitch and slope, a two-slatted roof and a four-slatted roof have the same surface area; it is the linear elements, accessories, and shapes that change.
- The accessories are counted from the shelves, the tiles from the manufacturer's specifications.
- The minimum slope and compliance are verified in the reference documents, not in a calculation.
To quickly and accurately measure your angles, measure your edges and cuts directly on the PDF plan with MeasureAll: a complete file is provided to try the application.
How to calculate the surface area of a roof?
Measure the horizontal projection of each panel, including the edges, then divide it by the cosine of its slope angle. With a slope in percentage terms, multiply the projection by the square root of 1 + (slope ÷ 100²)². Then add the panels together. A 100 m² roof with a slope of 30° develops 115.47 m² of coverage.
Calculating the roof area: is it necessary to include the overhangs?
Yes, when they receive the same coverage as the rest of the roof. Add their horizontal projection to the dimensions of the walls before applying the slope coefficient. If they are aligned along the ridge, project them first. And if your plan already represents the external contour of the roof, do not add them a second time.
Calculation of the m2 of the roof: can we start from the living area?
No. The habitable surface is an interior surface: it does not describe the external extent of the walls, the overhangs, or the slope of the slopes. Start with a roof plan or the listed external dimensions, reconstruct the horizontal projection of each panel, and then apply the slope correction.
What is the slope coefficient of a roof?
This is the factor that converts a projected surface into an inclined surface. It is 1 divided by the cosine of the angle, or the square root of 1 + (slope ÷ 100)² for a percentage slope. It is 1.0440 for a 30% slope, 1.1547 for a 30° angle, and 1.4142 to 45°.
A slope of 100%, is that a vertical roof?
No. A slope of 100% means that the vertical distance is equal to the horizontal distance: the angle is 45°. A vertical wall has no percentage-expressible slope, because its horizontal distance is zero. The correspondence is through the tangent of the angle: therefore, degrees are never converted into percentages by a simple rule of three.
How to calculate the area of a two-slatted roof?
If the two sides are identical, multiply the length of the roof, including the ridge ends, by the inclined length of a panel, including the gutter ends, then by two. You can also multiply the total area of the roof by the slope coefficient, without then multiplying by two. If the two sides do not have the same slope, calculate them separately before adding them together.
How to measure the surface area of a roof without going up on it?
From a side view: measure the roof’s footprint on the top view and find the slope on a section or facade. With a PDF plan, an app like MeasureAll allows you to calibrate the plan and measure the slopes, taking into account their slope, from the office. Without a plan, an aerial view provides a first estimate.
How to switch from MeasureAll to the number of tiles?
Start from the developed area of each panel measured on the PDF plan, then multiply it by the m² consumption indicated by the manufacturer for the model and gutter selected. Then count the accessories from the linear systems: siding, gutters, and downspouts. Finally, add a justified margin of loss and round off to the packaging dimensions.
«Significant time savings. Easy to use.»
Carrier 35,000 · App Store reviews
Equipping a team of roofers? Group subscriptions, activation codes, single invoice.
Request a business quoteYour roofs are measured on the plan
A complete file offered for testing.
Questions about roofers
Is the slope taken into account in the roof area?
Yes. You indicate the slope, and MeasureAll calculates the actual coverage area, not just the projection visible on the plan.
Can I measure the eaves, ridges, and gutters?
Yes, with the linear tool: place your points along the path, the cumulative total is displayed instantly, ready for the command.
Does it work on the roof, without a network?
Yes. MeasureAll works offline as soon as your plans are in the app. Try it for free: a complete folder is offered.